

That is exactly why the setup phase deserves more attention than it normally gets. An admin sets disk partitioning, RAID config, and network addressing in the first hour. Changing them later is painful: a reworked partition scheme means a migration window, not a config edit.
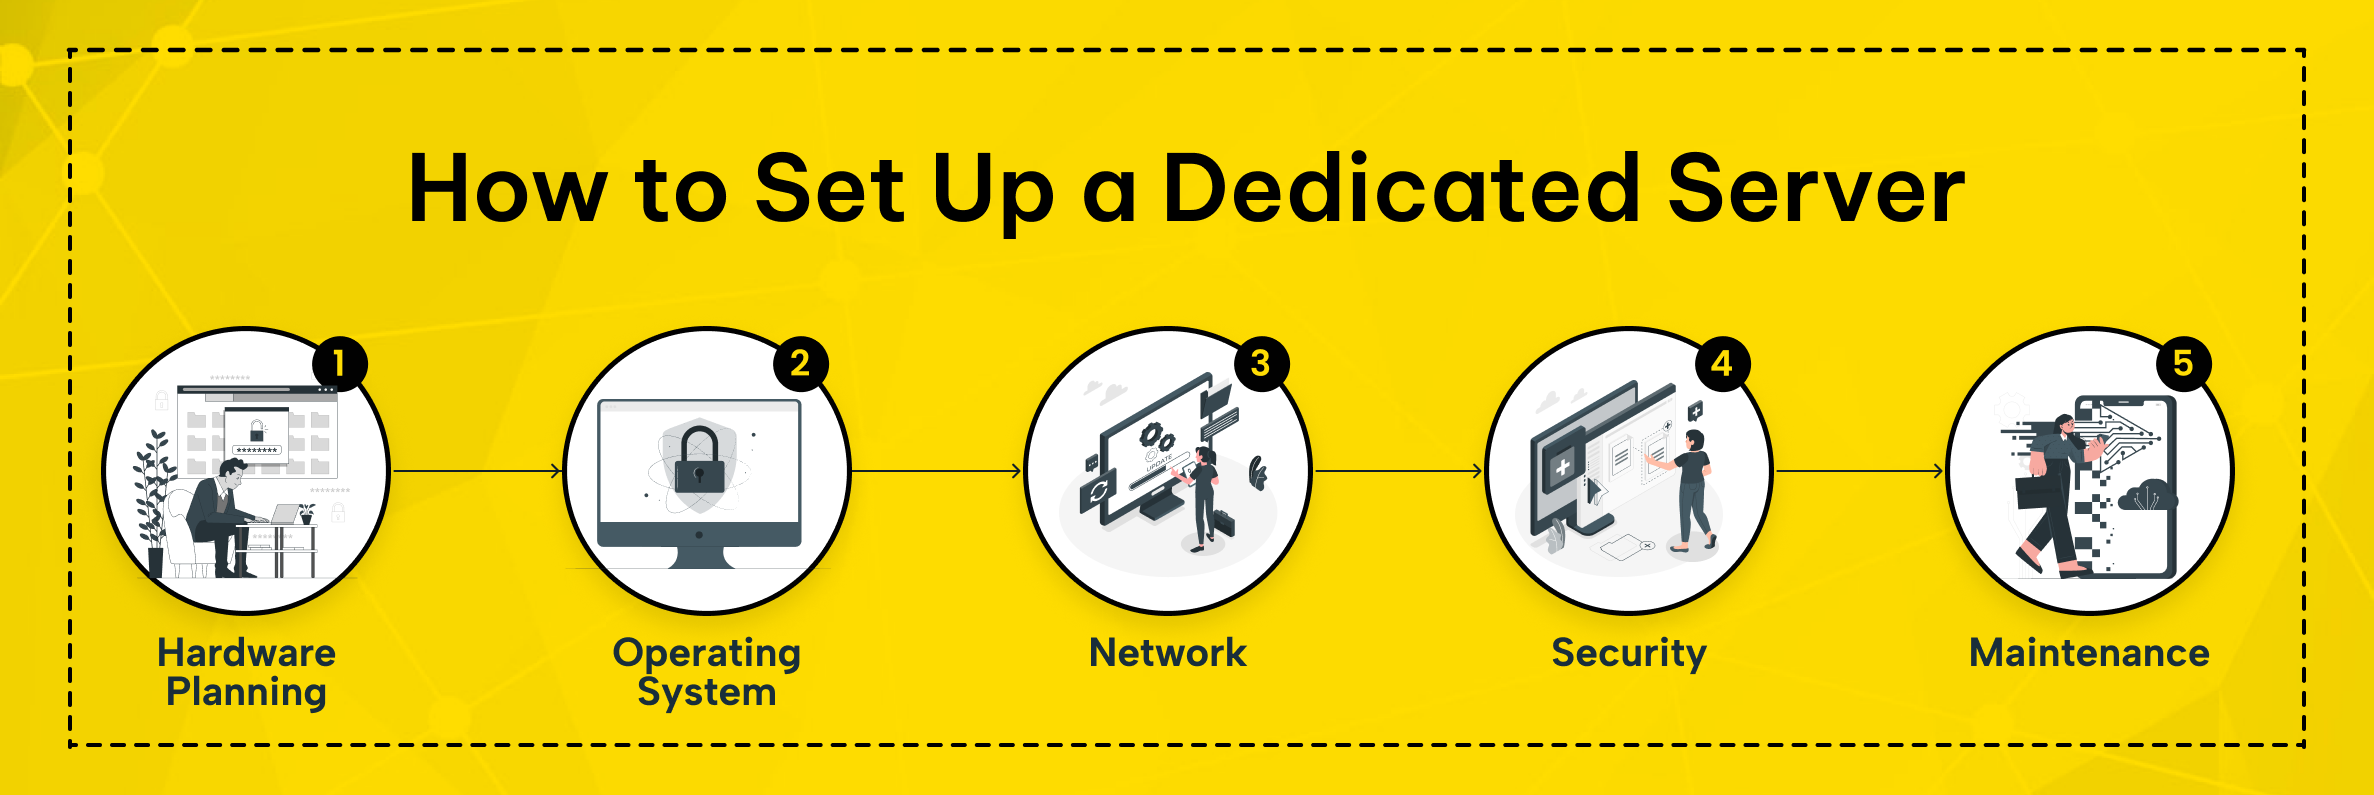
This guide is for technical teams, e-commerce operations, and growing companies getting their first or next physical machine. It covers hardware planning, OS install, network config, security hardening, and maintenance, in the order you perform them.
What a Dedicated Server Is, and Who Actually Needs One
A dedicated server is a physical machine for one customer. The CPU, memory, storage, and network are yours alone, not shared through the hypervisor. Performance stays steady: no neighbor can eat your I/O at peak hours
Predictability is the whole point. A database that needs steady latency runs better on unshared hardware. So do ERP systems with many users and busy e-commerce sites. Regulated workloads must also know which machine holds their data
Dedicated hardware also gives you full control over the stack: kernel version, storage layout, virtualization layer, custom drivers. If your application needs something a managed platform will not allow, a physical server is usually the answer.
Dedicated Server vs. VPS vs. Cloud Server: Matching the Workload
| Criterion | Dedicated Server | VPS | Cloud Server |
|---|---|---|---|
| Resource allocation | Entire machine, unshared | Fixed slice of a host | Pooled, allocated on demand |
| Performance consistency | Highest, no neighbors | Good within the assigned quota | Good, varies with the platform |
| Scaling speed | Hardware change, planned | Package upgrade | Fastest, near-instant |
| Hardware-level access | Full (BIOS, RAID, KVM/IDRAC/ILO) | None | None |
Choose dedicated hardware for consistent performance or hardware-level control, and choose a cloud server. Choose a cloud server when your bottleneck is how quickly you can change capacity.
Before installing, decide between renting and buying. If you buy, you own the hardware lifecycle and the data center contract. If you rent, the provider takes on hardware, power and security.
With co-location, you keep your own hardware in the provider's data center and covers the same physical requirements.
Setting Up a Dedicated Server: The Five Core Steps
The stages below follow the order you perform them. Each one constrains the next, which is why skipping ahead creates rework rather than saving time. Installing the operating system before deciding the RAID layout is the classic example.
Step 1: Plan and Choose the Hardware
Start from the workload, not the spec sheet. Analyze what the application needs today and what it will plausibly need in eighteen months, then size accordingly.
- Processor (CPU): The processor directly sets performance. Choose many cores for high traffic and parallel handling; choose clock speed for single-threaded tasks.
- Memory (RAM): 16 GB, 32 GB or more depending on the workload. Databases and caching layers are the main reason to go higher. Too little memory pushes the system into swap. Swapping to disk then wipes out the CPU advantage you paid for
- Storage: SSDs are substantially faster than mechanical disks under random I/O, which is what databases actually generate. Plan the RAID level at this stage. Use RAID 1 for redundancy on a small setup, and RAID 10 when you need write performance as well.
- Bandwidth: High-traffic projects need dedicated, non-contended bandwidth rather than a shared port. Ask what the provider guarantees, not just what the port can do. A 1 Gbps uplink shared across dozens of machines is not the same as guaranteed bandwidth.
Data center selection belongs to this step as well.
RAID is not a backup. It protects against a failed disk. It does not protect against a deleted table, ransomware or a corrupted file copied across the array. Plan your backup strategy as a separate item, not as a byproduct of the RAID level you chose.
Step 2: Select and Install the Operating System
Two families dominate: Linux distributions and Windows Server.
Linux. Ubuntu Server, Debian, Rocky Linux and similar distributions are open source, flexible and carry no license cost. They are the default for web servers, containers and most modern application stacks.
Windows Server. Use it for .NET, MSSQL, or Active Directory; the GUI helps Microsoft teams, but each server needs a license.
The installation itself follows a predictable sequence:
- Boot the server from a USB drive, mounted ISO or remote console session.
- Adjust the boot order in BIOS/UEFI so the installation media is read first.
- Follow the installer, then configure disk partitioning deliberately. Use separate partitions for system, app data, and logs to prevent a runaway log from filling the root filesystem.
- If you planned RAID, configure it now via the hardware controller or the installer.
- Set a strong root or Administrator password. Store it in a password manager, not a shared document.
For remote access, Linux uses SSH and Windows uses RDP; configure and harden both right after installation. Default settings are the most common opening.
Step 3: Configure the Network and IP Addresses
Your provider assigns the static IP addresses; you enter them into the system configuration. On Linux this happens in /etc/netplan/ on Ubuntu, or /etc/network/interfaces on older Debian.
On Windows, you do it through the network adapter properties Official See the official Netplan documentation. It explains the configuration format. Follow it for the exact syntax; a malformed config file can leave the machine unreachable after reboot.
A wrong gateway makes the server respond locally but route nowhere. Set the gateway as specified and define two DNS resolvers so one outage cannot stop name resolution.
Then verify. Ping an external address and connect via SSH or RDP from outside to test outbound routing and inbound access. If either fails, check the firewall; console-only success means firewall, not routing.
Step 4: Harden the Server
A newly provisioned machine with a public IP starts receiving automated login attempts almost immediately. Hardening is not a later phase; it belongs in the same session as the installation.
- Patch first. Apply all OS and package updates before the server handles traffic. Attackers scan for known flaws.
- Stop logging in as root. Create an administrative user and grant privileges through sudo. On Windows, avoid daily use of the built-in Administrator account.
- Use SSH keys instead of passwords. and disable password login entirely. Key-based access removes brute-force attempts from the threat model rather than merely slowing them down.
- Close everything you are not using. A firewall should open only the ports the service needs: 80 and 443 for a web server, plus your management port. Use ufw or iptables on Linux and Windows Defender Firewall on Windows Server.
- Expect large flood attacks. Fail2ban stops brute force; block real DDoS upstream at the data center edge. Combine edge filtering with a properly configured firewall and security service. Set up a firewall and security service. Configure it properly covers both layers.
- Watch the logs. Check login and system logs often; set alerts for odd activity. Logs nobody reads are an audit artifact, not a security control.
On a production server, turn off root login and password auth for SSH. Two sshd_config lines fix this common error.
Step 5: Set Up Management and Maintenance
Setup ends when the server is running; operations begin immediately after.
Monitoring: Monitor CPU, memory, disk, and network constantly. Use top or htop on Linux, or Task Manager on Windows, for quick checks; production needs an alerting agent.
Backups: Follow the 3-2-1 principle: three copies on two media, one offsite. Automate backups and verify they run; a silent failure is worse than none.
Schedule updates and maintenance. Apply security patches promptly and schedule reboots into a maintenance window rather than reacting to one at 3 a.m. Kernel and firmware updates especially need a planned slot.
Housekeeping: Rotate and archive logs, clear temp files, and remove expired backups. Full storage silently breaks the app for unrelated reasons.
Hardware care: In a rented server this is the provider's job, but know what it covers. Dust removal, fan checks and SMART health scans catch a failing drive before it takes your data with it.
Test a restore, not just a backup, by restoring one file and one database into staging. Time it; that number is your real recovery time and the first thing asked during an incident.
A Practical Checklist for SMEs and E-Commerce Teams
Smaller teams lack a dedicated systems engineer, so the real risk is unclear responsibility, not difficult steps. Work through this list before a dedicated server carries live traffic:
- Confirm who holds the credentials. Keep root password, control panel login, and remote console access in a shared password manager, not a personal laptop.
- Document the network configuration. IP addresses, gateway, DNS servers and open firewall ports, kept somewhere your team can reach without logging into the server.
- Verify out-of-band access before you need it. Test KVM, IDRAC, and ILO access while the machine is healthy. Do not find out they are missing when the OS fails to boot.
- Run a backup and a restore. Not just the job configuration: an actual restore, with a recorded duration.
- Set alert thresholds. Disk above 80 percent, unusual CPU load, failed login spikes. Alerts that arrive after the outage are reporting, not monitoring.
- Plan the seasonal peak. For e-commerce, check if normal-week hardware covers a campaign period. Decide in advance what to scale and how.
- Agree on the support path. Define which failures you handle, which go to the provider, and the response time you can expect.
Measure checkout database response time under load before the campaign—it turns hardware limits into abandoned carts.
Mistakes That Surface After the Server Goes Live
Some setup errors are invisible until traffic or an incident exposes them.
A single DNS resolver. Everything works until the resolver fails. So a fully connected server cannot resolve any hostname.
Backups stored on the same machine. A backup on the same RAID array survives accidental deletion. It will not survive controller failure, compromise, or filesystem corruption, so move it off the machine.
Keep a record of firewall changes. You open a port during troubleshooting and never close it. A scanner finds it before your team does.
Skipping the post-migration verification. After moving an app to the new server, confirm DNS records, SSL certificates, and scheduled tasks. Forgotten cron jobs stay hidden until a report fails to arrive.
Sizing for the average. Hardware chosen against average load will be at its limit during the peak that actually matters. Size against the peak and treat the average as headroom.
How Makdos Supports Dedicated Server Deployments
The technical steps above are consistent regardless of provider. What differs is how much of the setup burden you carry, and what happens at three in the morning when a disk fails.
Makdos delivers a dedicated server. The machine is fully yours. The data center is Tier III with N+N redundancy. Each facility has a 20 Gbit uplink and a 99.8 percent uptime commitment.
Servers get dedicated CPU, memory, and storage. Configurations fit the workload instead of fixed tiers. Free spare-part replacement covers hardware failures. A failed disk or memory module is our task, not your procurement problem.
The service simplifies setup: remote access via KVM, iDRAC, or iLO is ready from the start. OS choices include Windows Server, major Linux distributions, and FreeBSD, so Step 2 starts with a working installation. Monitoring and support run 24/7/365, and DDoS protection is optional for workloads exposed to volumetric attacks.
Use our in-house control panel and mobile app for daily management. Let managed services handle patching, monitoring and admin if you skip the maintenance cycle.
Use virtual servers on the same infrastructure if you do not need a full machine. Virtual servers are available. They run on the same infrastructure.
Getting Your Dedicated Server Right the First Time
Setup has five steps; the first three are hard to change after go-live.
Decide your partitioning, RAID level, and backup destination before the installer starts. Treat security hardening as part of the installation, not a follow-up task. You can adjust everything else once you learn how the workload behaves.
If you need a physical server with a managed infrastructure layer, consider our dedicated server solutions. These include redundant power, network, Tier III facilities, hardware replacement, and 24/7 monitoring. We offer dedicated server solutions.
They handle the infrastructure layer. or talk to our technical team about a configuration sized for your workload. The goal either way is a server that behaves the same on your busiest day as it does on a quiet one.